how to read a knitting chart
I splurged on a skein of pretty, pretty Sundara Petit Sock Yarn this month for my birthday
, and within a day of receiving it, cast on this terrifically ornate lace shawl. The pattern is charted only, so I thought it might be useful to do a little chart reading tutorial. Well, not so much a tutorial, as a “this is what works for me, and maybe I can offer some helpful hints to the chart-phobic” post.

First of all, I’m a visual person, so I just naturally like knitting from charts rather than long written row instructions. I find that a chart helps me not only knit a row fairly quickly, I can also easily see where a stitch should be sitting in relation to the stitches above and below it. This has helped me learn to “read” my knitting, so I can figure out where mistakes have happened or just where I am in a particular project. I can understand why looking at a knitting chart for the first time might feel a little overwhelming. And I don’t expect that everyone will learn to prefer charts to written patterns, because I know brains work differently, but I hope I can de-mystify them a bit.
To work from a chart I do a few things to prepare. First, of course, I print it out, fitting the chart to the whole page whenever possible (unless it’s a relatively small chart with just a few stitches and rows that repeat, then it’s nice to keep it smaller). The designers of most of my latest charted projects have included full-page charts, which makes it easy. I really appreciate that in a pattern. I’ve quickly charted a simple pattern (that I do not recommend you actually knit, because it’s just some random stitches and I seriously doubt that it would produce anything attractive) to use as an example.
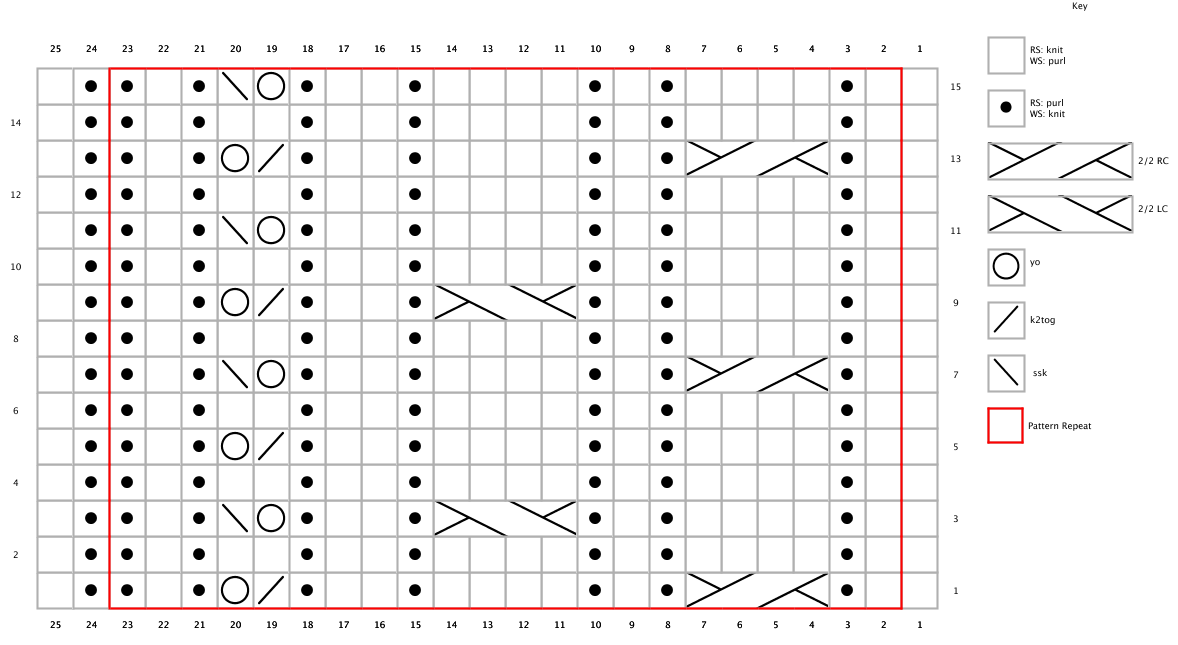
This chart is for knitting flat, as opposed to knitting in the round. If you look at the row numbers you’ll see the odd numbers on the right side of the chart and the even numbers on the left. This is a visual clue that tells you which direction to read the row, starting from the side with the number. You’ll always start at the bottom of the chart and work your way up. In this case, you’d start working on a right-side row, following the symbols in row 1, from right to left. When you finish that row, you’ll turn your work and begin row 2, reading the symbols from left to right. If you look at the key, you’ll see that some of the symbols mean different things depending on which side you’re currently working. This can take a little while to get straight in your brain, but it makes more sense once you’ve done a few rows. Here, for example, you’ll end up with a few columns of knits and purls. In other words, you’ll purl a stitch on the right side, but when you turn and work the next row, the stitch on top of that purled stitch will be a knit stitch, even though on the chart it’s the same symbol (the single black dot). That’s because the black dots are always purl stitches on the right side, but knit stitches on the wrong side.
Next, let’s talk about those cable stitches. They look almost exactly alike, but there are really two different kinds of cables in this chart. When I have more complicated stitches like these, I like to color-code them to make it even easier on myself. I did this the first time I made a Habitat hat, which has a plethora of different cables, and it made it so much easier. I use colored pencils or highlighter markers, and choose a color for each type of cable. I color the symbol in the key and then go through the chart and find all the matching symbols, and fill them in with the same color.
When I’m working from any knitting pattern, regardless if it has charts, I like to keep the printed pages in a sheet protector, just so it doesn’t get too wrinkled and tattered. I discovered that putting a chart in a sleeve like that was great, but my usual method for keeping track of what row I’m on using Post-it notes didn’t work at all since they fall right off the plastic. Then I discovered a use for all the washi tape I’ve been hoarding. It works great on the plastic sheet protector, but peels right up to move to the next row. I can use the same piece of tape many, many times before it starts to lose its stickiness. And I can cut it to any length I need. So I start with a piece of tape that is about the length of the row, and I fold over the end just a bit, to make it easier to peel it up when I need to move it.

I always put my tape marker above the row I’m about to work. This helps keep me from making mistakes, because I can see what kind of stitch should be directly below the stitch I’m working. For example, when I’m working row two, I can see that I should be purling when I get to that yarnover stitch from row one. If my count is off and I knit into the yarnover instead, hopefully I’ll notice before I get any further.
A few more random tips:
- If you’re knitting in the round, chart reading gets a whole lot easier. Since you’re not turning your work, but always working on the right side, you’ll always follow the chart from right to left (again, starting with row 1, at the bottom). You’ll also not need to worry about working the same symbols differently on the wrong side.
- If a pattern doesn’t have the key for the chart on the same page, I like to make a copy and tuck it in with the chart so I don’t have to flip back and forth if there are unfamiliar symbols.
- If a chart has a section enclosed in a border (usually a contrasting color, like the red I used above), it means that the pattern repeats itself. This is where stitch markers come in handy. The stitches outside the border are usually the edge of your project, and you repeat the stitches within the border a certain number of times per row. Place a marker after every repeat, and you’ll have another little checkpoint to prevent mistakes.
If you’d like to go digital, I’ve heard really good things about the knitCompanion app. I haven’t tried it yet because I seldom have access to our iPad Mini. My husband usually takes it with him to work or is using it when he’s home. He insists that it’s our iPad, but it was really his birthday/Christmas gift, and I have all I need with my phone and my kindle, so I don’t mind at all. I think I’ll download the 15-day trial and see if it will be worth the $16 investment to use on my phone. It just seems like the screen would be a little too small for big charts. I will report back!
Did I miss anything? Are you still confused or chart-phobic? Do you have any good chart-reading tips? I’d love to know all the different ways others use charts, so please share in the comments!
Read More